
"GPU无服务器架构:打造网页应用新技能!"
超过 1 年前
几乎每天都有新的开源生成式AI模型发布,其生成能力不断提升。你从各种渠道收到关于它有多棒的反馈,迫不及待地想亲自尝试,看看能用它做出什么酷炫的东西。但遗憾的是,你的消费级GPU内存有限,无法加载如此庞大的模型。你希望或许一个量化版本的模型,结合一些高效的内存管理技术,能克服这个障碍,但却遇到了无尽的问题和bug,直到它们被解决。如果你像我一样,对这些问题感到烦恼,只想在不花费巨资的情况下运行模型推理,那么我向你介绍无服务器GPU基础设施,在这里你可以轻松运行任何开源语言模型!
有多个公司提供无服务器基础设施,用户可以在其中运行AI模型,支持批处理作业队列,并提供高达80GB内存的GPU,按秒计费。说实话,我发现这比AWS、Azure或GCP等云服务巨头提供的方案要便宜得多,也更好,前提是你对连接各种事物有一定了解,或者愿意花些时间学习。特别是,我将介绍Modal,它提供按需付费的GPU服务,A80 GPU的价格低至3.5美元/小时,并且按需可用。作为单个开发者,你可以从免费订阅开始,他们提供了一个易于导航的仪表板,用于跟踪正在运行的容器及其成本,还有很棒的入门教程和大量示例,帮助你理解复杂的实现,并且在注册时还赠送一些免费小时数供你试用!
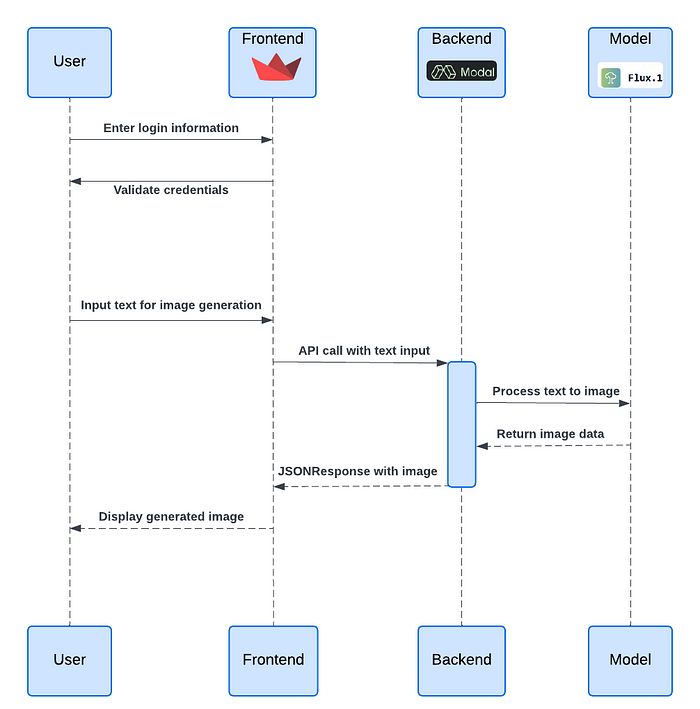
功能说明的块状图
在这个例子中,我将解释如何使用这个平台,结合最新的文本到图像模型——Flux,开始我的旅程。首先,我将在Modal上创建一个API端点,作为服务器,然后使用Streamlit创建一个极其简单的前端,通过API调用Modal端点。创建端点的Modal代码分为三个部分:
容器创建和包安装:这里指定了Modal容器的硬件配置,包括CPU数量、GPU内存、GPU类型、容器超时时间,以及需要安装的包和与AI模型文件保存和缓存相关的函数。
### 基本设置 import io from pathlib import Path import requests import modal import time import torch import os from uuid import uuid4 import base64 # ## 定义容器镜像,安装包 GPU_TYPE = os.environ.get("GPU_TYPE", "A100") GPU_COUNT = os.environ.get("GPU_COUNT", 1) GPU_CONFIG = f"{GPU_TYPE}:{GPU_COUNT}" MINUTES = 60 # 秒 MODEL_PATH = "black-forest-labs/FLUX.1-schnell" TOKENIZER_PATH = "black-forest-labs/FLUX.1-schnell" volume = modal.Volume.from_name( "Flux-volume", create_if_missing=True ) volume_path = ( # 容器内的卷路径 Path("/root") / "data" ) MODEL_DIR = "/model" def download_model_to_image(): import transformers from huggingface_hub import snapshot_download snapshot_download( MODEL_PATH, ignore_patterns=["*.pt", "*.bin"], ) # 否则,首次推理时会发生这种情况 transformers.utils.move_cache() flux_image = ( modal.Image.from_registry( "nvidia/cuda:12.2.0-devel-ubuntu22.04", add_python="3.11" ) .pip_install( "transformers", "numpy", "torch", "diffusers", "accelerate", "sentencepiece", "peft" ) .run_function( download_model_to_image, ) ) # 创建一个Modal应用 app = modal.App("flux-text-image") with flux_image.imports(): import torch from diffusers import DiffusionPipeline from fastapi import Response from fastapi.responses import JSONResponse import json # 容器生命周期 [`@enter` 装饰器] # 在启动时加载模型。然后,我们在 `run_inference` 函数中评估它。 # # 为了避免过多的冷启动,我们将空闲超时设置为240秒,这意味着一旦GPU加载了模型,它将保持在线4分钟,然后才会关闭。这可以根据成本/体验的权衡进行调整。 @app.cls(cpu=8.0, gpu=GPU_CONFIG, memory=32768, volumes={volume_path: volume}, timeout=5 * MINUTES, container_idle_timeout=5 * MINUTES, allow_concurrent_inputs=100, image=flux_image)Modal类:接下来是Modal类,包含多个装饰器,第一个是
enter,从缓存中加载模型。接下来是_inference,它接收提示和其他参数作为输入并生成图像。为每次执行生成一个唯一的request_id,生成的图像保存在之前定义的Modal卷中,如果需要,可以通过Modal仪表板访问。还定义了另一个inference函数来测试Modal类的remote功能,最后一个装饰器是web_endpoint,它使得可以使用web_inference函数创建一个Web API端点。它从API调用中接收提示和其他参数,执行_inference函数,将生成的图像转换为base64编码的字符串,并作为JSONResponse发送回去。还包括传递LORA路径和选择特定权重的可能性。### 加载模型并运行推理 class Model: @modal.enter() def enter(self): import torch from diffusers import FluxPipeline import subprocess # subprocess.run(["nvidia-smi"]) torch.cuda.empty_cache() print(torch.cuda.memory_allocated()/1024**2) print(torch.cuda.memory_reserved()/1024**2) pipe = FluxPipeline.from_pretrained("black-forest-labs/FLUX.1-schnell", torch_dtype=torch.bfloat16) pipe.enable_model_cpu_offload() # 通过将模型卸载到CPU来节省一些VRAM。如果你有足够的GPU资源,可以移除这一行 self.pipe = pipe def _inference(self, prompt, n_steps, guidance_scale, max_sequence_length, manual_seed): start = time.monotonic_ns() request_id = uuid4() print(f"Generating response to request {request_id}") print(prompt, n_steps, guidance_scale, max_sequence_length, manual_seed) if prompt is None: prompt = "A cat holding a sign that says No prompt found" image = self.pipe( prompt, # negative_prompt=negative_prompt, guidance_scale=guidance_scale, num_inference_steps=n_steps, max_sequence_length=max_sequence_length, generator=torch.Generator("cpu").manual_seed(manual_seed) ).images[0] model_path = volume_path / "runs" / str(request_id) model_path.mkdir(parents=True, exist_ok=True) image_path = Path.joinpath(model_path, 'Flux.png') print( f"request {request_id} completed in {round((time.monotonic_ns() - start) / 1e9, 2)} seconds" ) byte_stream = io.BytesIO() image.save(byte_stream, format="JPEG") with open(image_path, "wb") as file: file.write(byte_stream.getvalue()) return byte_stream.getvalue(), request_id @modal.method() def inference(self, prompt, n_steps, guidance_scale, max_sequence_length, manual_seed): byte_image, request_id =self._inference( prompt, n_steps=n_steps, guidance_scale=guidance_scale, max_sequence_length=max_sequence_length, manual_seed=manual_seed) return byte_image, request_id @modal.web_endpoint(docs=True) def web_inference( self, prompt: str = 'A default prompt', n_steps: int = 24, guidance_scale: float = 0.8, max_sequence_length: int = 256, manual_seed: int = None, lora_path: str = None, lora_weight: str = None, ): import random if not manual_seed: manual_seed = random.randint(0, 65535) if lora_path and lora_weight: print("Lora repo ", lora_path) print("Lora file name", lora_weight) self.pipe.load_lora_weights(lora_path, weight_name=lora_weight) else: self.pipe.unload_lora_weights() byte_image, request_id =self._inference( prompt, n_steps=n_steps, guidance_scale=guidance_scale, max_sequence_length=max_sequence_length, manual_seed=manual_seed) encoded_image = base64.b64encode(byte_image).decode() json_request_id = json.dumps({'uuid': str(request_id)}) return JSONResponse(content={"request_id": json_request_id, "image": encoded_image})测试函数:Modal允许通过声明
app.local_entrypoint装饰器在同一脚本中测试定义的函数和容器执行。通过成功执行model.inference.remote验证类的推理函数,该函数在远程Modal容器上执行代码并将输出返回给本地脚本。还通过向端点发送GET请求来测试API调用功能。要访问测试部分,可以通过modal serve Flux_txt_image_modal.py调用Python脚本。要临时创建和部署端点,可以运行modal serve Flux_txt_image_modal.py,要进行永久部署,可以运行modal deploy Flux_txt_image_modal.py。# 这是我们的入口点;CLI在此处被调用。 @app.local_entrypoint() def main(prompt: str = "Unicorns and leprechauns sign a peace treaty"): from PIL import Image from io import BytesIO import random model = Model() # 测试 _inference 函数 byte_image, request_id = model.inference.remote(prompt, n_steps = 5, guidance_scale=0.8, max_sequence_length=256, manual_seed=random.randint(0, 999999)) dir = Path("./Flux-images/"+str(request_id)) print(dir) if not dir.exists(): dir.mkdir(exist_ok=True, parents=True) image_path = Path.joinpath(dir, 'Flux.png') with open(image_path, "wb") as file: file.write(byte_image) ### 测试 web url 装饰器 url = model.web_inference.web_url params = { 'prompt': prompt, 'n_steps': 12, 'guidance_scale': 0.8, 'max_sequence_length': 256, 'manual_seed': 1234, } # 定义请求头 headers = { 'accept': 'application/json', 'Content-Type': 'application/json' } # 执行 GET 请求 response = requests.get(url, headers=headers, params=params) if response.status_code == 200: # 打印响应内容(可选) data = response.json() # 解析 JSON 响应 # print(response.content.image_content) encoded_image = data['image'] request_id = data['request_id'] image_data = base64.b64decode(encoded_image) image = Image.open(BytesIO(image_data)) output_path ="output1.png" print(f"Saving it to {output_path}") image.save(output_path) else: print(f'Error: {response.status_code}') print(response.text)
通过这种方式,可以轻松通过命令行界面测试任何新模型。只需选择合适的GPU型号并运行推理,不受资源限制。此外,通过创建一个部署在服务器上的Web界面,该界面通过API调用Modal端点,可以将能力从仅测试模型扩展到提供服务。流行的Python包streamlit允许创建简单的Web界面,并且可以部署在Streamlit云上,无需大量服务器前端经验。
Streamlit有很多围绕它的功能包。我想为此添加一个认证组件,使用户能够使用用户名和密码登录,使用streamlit-authenticator。为此,我创建了一个简单的配置文件,包含一些预定义的用户名、电子邮件ID和密码。但可以通过连接到存储用户凭据的数据库(例如deta space等)来创建更复杂的功能,并提供添加新用户、通过连接到Python邮件服务来恢复电子邮件/密码,甚至使用OAuth2通过Google/Microsoft账户登录的选项。认证过程的设置可能会很复杂,但由于这不是本文的重点,因此不会在这里详细介绍。
import streamlit_authenticator as stauth
from streamlit_authenticator.utilities import (CredentialsError, LoginError, ResetError)
import yaml
import streamlit as st
from yaml.loader import SafeLoader

# 加载配置文件
with open('./data/config.yaml', 'r', encoding='utf-8') as file:
    config = yaml.load(file, Loader=SafeLoader)

# 或者从 streamlit secrets.toml 文件加载配置
config = {
    'credentials': {
        'usernames': {
            username: {
                'email': user_data['email'],
                'failed_login_attempts': user_data['failed_login_attempts'],
                'logged_in': user_data['logged_in'],
                'name': user_data['name'],
                'password': user_data['password']
            }
            for username, user_data in st.secrets['usernames'].items()
        }
    },
    'cookie': {
        'expiry_days': st.secrets['cookie']['expiry_days'],
        'key': st.secrets['cookie']['key'],
        'name': st.secrets['cookie']['name']
    },
    'pre-authorized': {
        'emails': st.secrets['pre-authorized']['emails']
    }
}

# 创建认证对象
authenticator = stauth.Authenticate(
    config['credentials'],
    config['cookie']['name'],
    config['cookie']['key'],
    config['cookie']['expiry_days'],
    # auto_hash=True,
)

# 创建登录小部件
try:
    authenticator.login(location="sidebar")

except LoginError as e:
    st.error(e)

if st.session_state["authentication_status"]:
    authenticator.logout(location="sidebar")
    st.write(f'Welcome *{st.session_state["name"]}*')
elif st.session_state["authentication_status"] is False:
    st.error('Username/password is incorrect')
elif st.session_state["authentication_status"] is None:
    st.warning('Please enter your username and password')

# 保存配置文件
with open('../config.yaml', 'w', encoding='utf-8') as file:
    yaml.dump(config, file, default_flow_style=False)

# 创建密码重置小部件
if st.session_state
推荐阅读:


FluxAI 中文
© 2026. All Rights Reserved